If you’ve ever stared at the Shopify App Store and thought, do I really need another monthly subscription just to take preorders? — you’re not alone. Pre-orders are one of the highest-leverage moves in ecommerce: they validate demand before you commit capital, smooth cash flow during restocks, and turn product launches into actual revenue events instead of crossed fingers. They pair naturally with continue selling when out of stock and low stock alerts when inventory gets tight.
The good news: you can absolutely run preorders on Shopify without installing an app. The honest news: the native setup has real ceilings, and one of them — partial payments — is a deal-breaker for most serious launches.
Here’s the practical guide, the limitations, and where the line actually sits.
The TL;DR
Shopify doesn’t ship a built-in “Pre-Order” button, but you can simulate the workflow using three native settings:
- “Continue selling when out of stock” on the product inventory
- Manual payment capture in your payment settings
- Theme customization or clear product copy to communicate pre-order terms
That’s enough for a basic, low-volume preorder. It is not enough for partial payments, deposits, automatic button labeling, or anything resembling a clean launch playbook for big Shopify stores. For a dedicated pre-order button workflow, see our guide on adding a pre-order button on Shopify.
How to Set Up Pre-Orders on Shopify Without an App
Step 1: Enable “Continue selling when out of stock”
This is the foundation. By default, Shopify hides the buy button when a product hits zero inventory. To accept orders past that point:
- Go to Products → [Your product] → Inventory
- Check “Continue selling when out of stock”
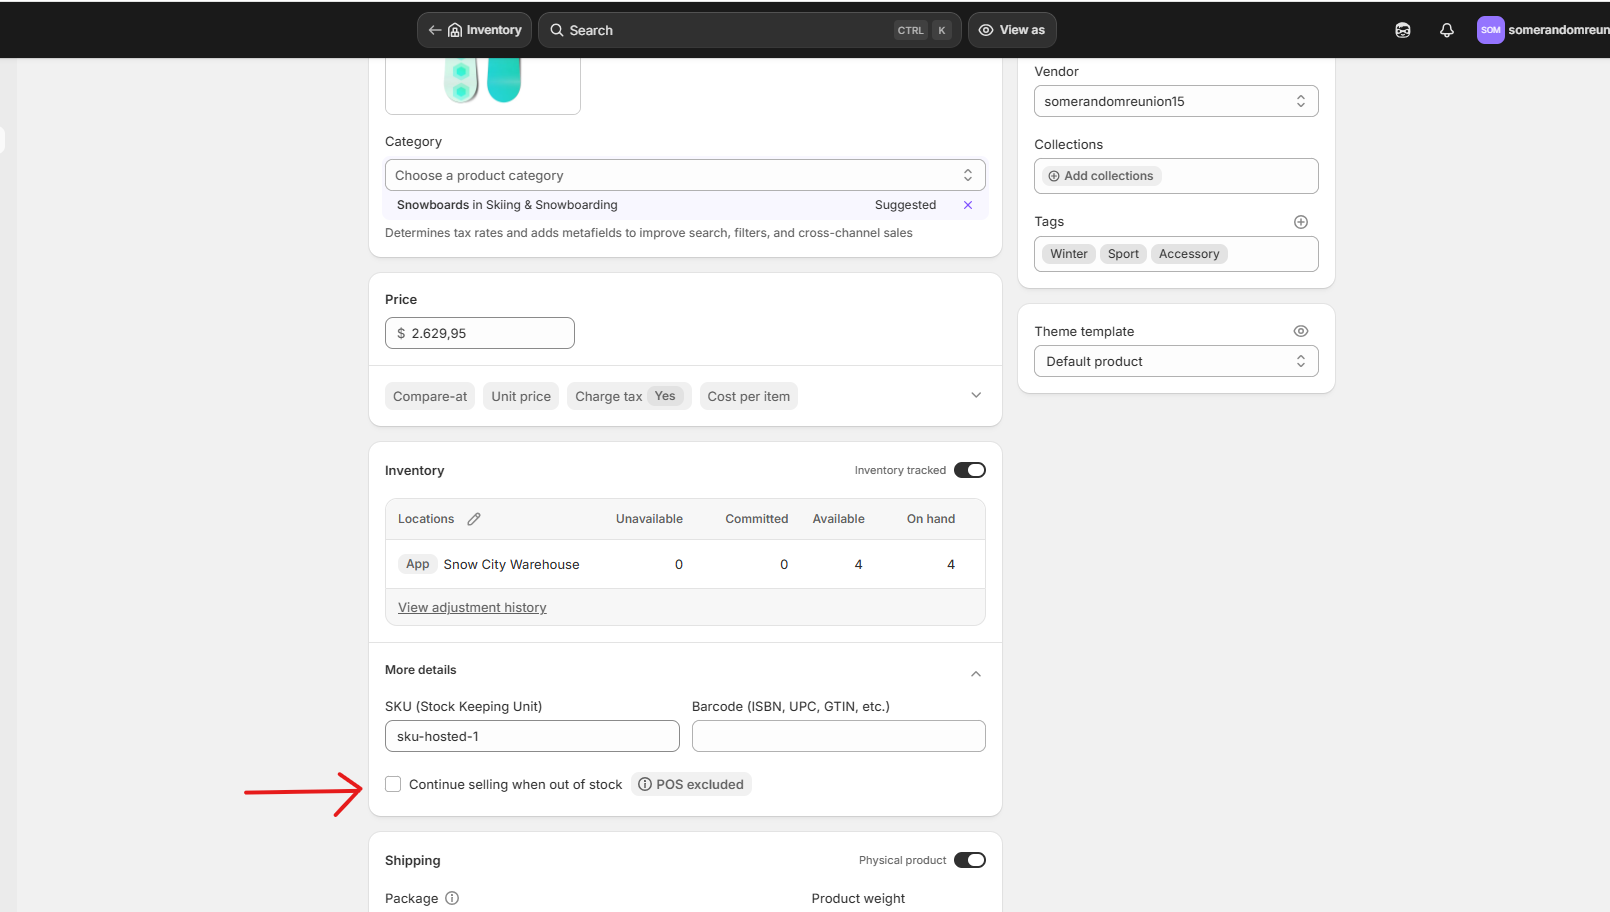
Customers can now place orders even when stock is at 0 or negative. Technically, that’s a pre-order.
Important note: nothing visually tells the customer it’s a pre-order — the button still says “Add to cart,” and there’s no badge.
Step 2: Switch Payment Capture to Manual
You probably don’t want to charge customers in full for an item shipping in three months — and then handle refunds when timelines slip. Manual capture lets you authorize the card at checkout but capture the funds later.
- Go to Settings → Payments → Payment capture method → Manage
- Select Manually, then Save

There’s a gotcha here: Shopify’s default authorization window is 7 days. After that, the authorization expires and you have to ask the customer to re-pay. For a pre-order shipping in 30, 60, or 90 days, that’s a real problem. Some third-party payment gateways extend the window, but Shopify Payments itself doesn’t.
Step 3: Make It Visually Obvious It’s a Pre-Order
This is where the no-app path gets coded. Two routes, depending on how much polish you want.
Option A: Edit the product copy only (no code)
Update the product title and description: “PRE-ORDER: Ships by [Month Day, Year].” Cheap, works. The button still says “Add to cart,” and customers rely entirely on reading the copy.
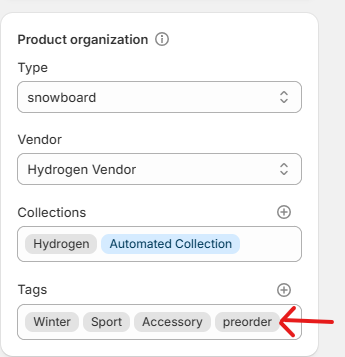
Option B: Tag-based code (recommended)
This approach uses Shopify’s product tags to flag pre-orders, then conditionally changes the button text, adds a badge, and shows a ship-date message. You stay in full control: tag a product preorder, and it shows up as a pre-order everywhere. Untag it, and it’s a normal product again.
Setup:
- Tag each pre-order product with
preorder— Products → [Your product] → Tags
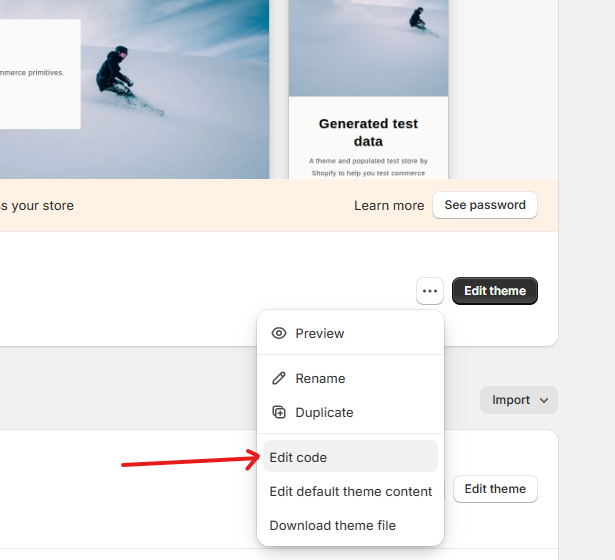
- Open your theme code — Online Store → Themes → ⋯ → Edit code
The file names below assume a modern Dawn-based theme. Older themes (Debut, Brooklyn, etc.) may use sections/product-template.liquid instead — search for add_to_cart to find the right line.
1. Change the button text
Open snippets/buy-buttons.liquid and find this line:
<span>{{ 'products.product.add_to_cart' | t }}</span>Replace it with:
<span>
  {%- if product.tags contains 'preorder' -%}
    Pre-Order Now
  {%- else -%}
    {{ 'products.product.add_to_cart' | t }}
  {%- endif -%}
</span>
Why tags instead of inventory: you could trigger this off inventory_quantity <= 0, but then every out-of-stock product would auto-flip to “Pre-Order Now” — including ones you never intended to sell as pre-orders. Tags keep it intentional.
2. Add a pre-order badge above the product title
Open sections/main-product.liquid, find the product title block (search for product__title), and add this just above it:
{%- if product.tags contains 'preorder' -%}
  <span class="preorder-badge">Pre-Order</span>
{%- endif -%}
3. Add a ship-date message below the buy button
In the same sections/main-product.liquid file, find the buy buttons block and add this directly underneath:
{%- if product.tags contains 'preorder' -%}
  <p class="preorder-message">
    📦 This item is on pre-order. Estimated ship date: <strong>April 15, 2026</strong>.
  </p>
{%- endif -%}
Heads-up: this date is hard-coded. To vary it per product, add a metafield (Settings → Custom data → Products → Add definition) and reference it via {{ product.metafields.custom.preorder_ship_date }}. Still no app required, but you’re adding setup overhead per product.
4. Style the badge and message
Open assets/base.css (or your theme’s main stylesheet) and paste this at the bottom:
.preorder-badge {
  display: inline-block;
  background: #111;
  color: #fff;
  padding: 4px 10px;
  border-radius: 4px;
  font-size: 11px;
  font-weight: 600;
  letter-spacing: 0.06em;
  text-transform: uppercase;
  margin-bottom: 8px;
}
.preorder-message {
  margin-top: 14px;
  padding: 12px 14px;
  background: #f6f6f6;
  border-left: 3px solid #111;
  font-size: 14px;
  line-height: 1.5;
  border-radius: 2px;
}
Change the #111 to your brand color if black isn’t your style.
5. Flag pre-orders on collection pages
So customers see the pre-order status before clicking into the product, open snippets/card-product.liquid and add this inside the card markup (a good spot is right after the product title):
{%- if card_product.tags contains 'preorder' -%}
  <span class="preorder-badge">Pre-Order</span>
{%- endif -%}
The CSS from step 4 already covers the styling — no extra work.
A developer can do all five edits in 20–30 minutes. If you’re comfortable in Liquid, you can DIY it in an afternoon. If not, this is a small enough scope to hand to a Shopify Expert for under $100. Just remember: every theme update may overwrite your edits, so document what you changed.
Step 4: Manage Fulfillment and Communication Manually
The setup is done. Now you do the work an app would normally do:
- Tag pre-order customers in your CRM
- Send manual order confirmations clarifying ship dates
- Send update emails as production progresses
- Capture payments before the 7-day window closes (or extend with a third-party gateway)
- Reconcile inventory when products arrive
It’s doable. It’s also a recurring overhead that compounds with every launch.
What This Setup Can’t Do
Here’s where the native approach starts to crack:
| Capability | Native Shopify | Pre-Order App |
|---|---|---|
| Accept orders past zero inventory | ✅ | ✅ |
| Visible “Pre-Order” button label | ❌ (requires code) | ✅ |
| Pre-order badges on collection pages | ❌ | ✅ |
| Partial payments / deposits | ❌ | ✅ |
| Extended payment authorization | ❌ (7-day cap) | ✅ |
| Automatic customer notifications | ❌ | ✅ |
| Pre-order quantity limits | ❌ | ✅ |
| Pre-order revenue reporting | ❌ | ✅ |
| Discount stacking on pre-orders | ❌ | ✅ |
| B2B pre-orders | ❌ | ✅ |
There’s also a less obvious risk: if Shopify Payments sees a high volume of unfulfilled orders without clear pre-order context, your account can get flagged for review and payouts paused. Pre-order apps mark these orders as intentional, which protects the account. The native workaround doesn’t. If stock runs out before launch day, running out of stock on Shopify covers what happens next on the storefront.
The Real Bottleneck: Partial Payments and Deposits
Here’s the limitation that actually matters at scale — and the one you can’t engineer around with theme code: you can’t natively collect a partial payment or deposit on Shopify.
Why this matters:
- High-ticket items ($200+) typically see 15–25% cancellation rates on full-price pre-orders. Deposit pre-orders (20–50% upfront) drop that to 5–10%. Full-price pre-orders generate more upfront cash, but the cancellation tax often eats the difference.
- Manufacturing-funded launches need partial cash to start production but can’t justify full charges 60–90 days before shipping.
- B2B and wholesale pre-orders almost always require deposit structures to be taken seriously by buyers.
This is exactly the gap Notify Me! closes. The app lets you:
- Set a fixed deposit amount (e.g. $10) or a percentage (e.g. 20%) due at checkout
- Schedule the remaining balance for a specific date or a relative trigger (e.g. 14 days after the order)
- Display the upfront amount and remaining balance transparently at checkout
- Handle the deferred capture automatically — with no 7-day authorization scramble
You’re not just adding a button. You’re unlocking a payment structure Shopify doesn’t natively support, with the cancellation math working in your favor.
When Native Is Fine — and When to Upgrade
Skip the app if:
- You’re running one-off, low-volume pre-orders (under ~20 units)
- Your products are under ~$50 and full payment at checkout is fine
- Your ship window is under 7 days — the auth limit isn’t a blocker
- You have in-house dev resources to handle theme customization
Get an app if any of these are true:
- You run recurring restocks or launch cycles and the manual overhead compounds
- Your AOV is over ~$100 and deposits would reduce cancellations
- You want a visible “Pre-Order” button without dedicating dev time
- You need automated customer comms for confirmations, updates, and balance reminders
- You’re scaling into B2B pre-orders or running launches across multiple SKUs
The native method is a perfectly fine MVP. It stops being fine the moment pre-orders become a repeatable channel.
The Bottom Line
You don’t need an app to take a pre-order on Shopify. You need one the moment pre-orders stop being an experiment and start being a strategy — when partial payments, automated workflows, and proper merchandising start determining whether a launch hits its number or limps across the line.
If you’re at that point, Notify Me! handles the pieces Shopify won’t — starting with the deposit feature the native setup simply can’t replicate.