
Short answer: yes, you can add a wishlist to Shopify without an app. No, Shopify doesn’t ship one natively. And no, most of the DIY methods will not survive a real store at scale — but a couple work fine if you have under a few hundred products and a developer-friendly theme.
This guide gives you every working method, the actual code, and an honest take on where each one breaks. By the end you’ll know whether to ship the DIY version or skip the headache.
Does Shopify have a built-in wishlist?
No. As of 2026, Shopify still doesn’t include a wishlist feature in any plan — not Basic, not Plus. You either build one yourself or install a third-party app.
That’s why this keyword exists. Tens of thousands of merchants search “shopify wishlist without app” every month hoping for a hidden setting. There isn’t one. But there are four reasonable ways to build one with Liquid, JavaScript, and metafields — let’s go through them.
Method 1: localStorage wishlist (the most common DIY)
This is the method 90% of “free wishlist” tutorials teach. You add a heart button to your product cards, save product data to the browser’s localStorage, and render a wishlist page from that stored array.
Pros: No login required. Works offline. Zero backend. ~50 lines of code.
Cons: Wishlist lives in one browser, on one device. If a shopper saves on mobile and comes back on desktop, their wishlist is empty. Clear cookies? Gone. Switch browsers? Gone. You also can’t email them when an item drops in price or restocks — you have no idea who they are.
Step 1 — Add a wishlist button to your product page
Open your theme code editor (Online Store → Themes → Edit code) and find your product template snippet (usually snippets/product-card.liquid or inside sections/main-product.liquid). Drop this in wherever you want the heart:
<button
  type="button"
  class="wishlist-btn"
  data-id="{{ product.id }}"
  data-handle="{{ product.handle }}"
  data-title="{{ product.title | escape }}"
  data-image="{{ product.featured_image | image_url: width: 400 }}"
  data-price="{{ product.price | money }}"
  aria-label="Add to wishlist">
  <span class="wishlist-icon">♡</span>
  <span class="wishlist-label">Save</span>
</button>
Step 2 — Wire up the JavaScript
Add this to assets/wishlist.js (create the file) and include it from theme.liquid with {{ 'wishlist.js' | asset_url | script_tag }}:
(function () {
  const KEY = 'shopify_wishlist_v1';
  const read = () => JSON.parse(localStorage.getItem(KEY) || '[]');
  const write = (list) => localStorage.setItem(KEY, JSON.stringify(list));

  function syncButton(btn, list) {
    const inList = list.some(i => i.id === btn.dataset.id);
    btn.classList.toggle('in-wishlist', inList);
    btn.querySelector('.wishlist-icon').textContent = inList ? '♥' : '♡';
    btn.querySelector('.wishlist-label').textContent = inList ? 'Saved' : 'Save';
  }

  function updateCount() {
    const count = read().length;
    document.querySelectorAll('.wishlist-count').forEach(el => {
      el.textContent = count;
      el.hidden = count === 0;
    });
  }

  document.querySelectorAll('.wishlist-btn').forEach(btn => {
    syncButton(btn, read());

    btn.addEventListener('click', () => {
      let list = read();
      const exists = list.find(i => i.id === btn.dataset.id);
      if (exists) {
        list = list.filter(i => i.id !== btn.dataset.id);
      } else {
        list.push({
          id: btn.dataset.id,
          handle: btn.dataset.handle,
          title: btn.dataset.title,
          image: btn.dataset.image,
          price: btn.dataset.price,
          addedAt: Date.now()
        });
      }
      write(list);
      syncButton(btn, list);
      updateCount();
    });
  });

  updateCount();
})();
Step 3 — Build the wishlist page
Create a new page in Online Store → Pages called “Wishlist” with handle wishlist. Then create a template templates/page.wishlist.liquid and assign it to that page:
{% layout 'theme' %}

<div class="page-width wishlist-page">
  <h1>Your wishlist</h1>
  <div id="wishlist-grid" class="wishlist-grid"></div>
  <p id="wishlist-empty" hidden>
    Your wishlist is empty.
    <a href="{{ routes.collections_url }}/all">Browse products</a>.
  </p>
</div>

<script>
  (function () {
    const list = JSON.parse(localStorage.getItem('shopify_wishlist_v1') || '[]');
    const grid = document.getElementById('wishlist-grid');
    const empty = document.getElementById('wishlist-empty');

    if (!list.length) { empty.hidden = false; return; }

    grid.innerHTML = list.map(item => `
      <article class="wishlist-card">
        <a href="/products/${item.handle}">
          <img src="${item.image}" alt="${item.title}" loading="lazy">
          <h3>${item.title}</h3>
          <p>${item.price}</p>
        </a>
        <button data-id="${item.id}" class="wishlist-remove">Remove</button>
      </article>
    `).join('');

    grid.addEventListener('click', e => {
      const btn = e.target.closest('.wishlist-remove');
      if (!btn) return;
      const next = JSON.parse(localStorage.getItem('shopify_wishlist_v1'))
        .filter(i => i.id !== btn.dataset.id);
      localStorage.setItem('shopify_wishlist_v1', JSON.stringify(next));
      btn.closest('.wishlist-card').remove();
      if (!next.length) { grid.innerHTML = ''; empty.hidden = false; }
    });
  })();
</script>
That’s the full localStorage wishlist. It works. It also has a 30-50% drop-off rate on cross-device shoppers, no analytics, and you can’t email anyone when something they wanted goes on sale or restocks. Which leads to method 2.
Method 2: Customer metafields (the “proper” DIY approach)
If your shoppers create accounts, you can store the wishlist on the customer object via metafields. Now the wishlist follows them across devices, and you can technically email them — though sending those emails is a separate problem.
Pros: Cross-device sync. Real data you can query. Survives browser clears.
Cons: Requires the customer to log in (instant 60–80% drop-off vs anonymous). Writing to metafields from the storefront needs the Storefront API with a customer access token, or an App Proxy + a tiny serverless function. There’s no copy-paste solution — you’re committing to dev work.
Set up the metafield
Go to Settings → Custom data → Customers → Add definition:
- Namespace and key:
custom.wishlist - Type:
JSON - Access: Storefront read + write
Show the wishlist state in Liquid
{% if customer %}
  {% assign wishlist_raw = customer.metafields.custom.wishlist.value | default: '[]' %}
  {% assign wishlist = wishlist_raw | parse_json %}

  <button
    class="wishlist-btn-meta"
    data-id="{{ product.id }}"
    data-customer="{{ customer.id }}">
    {% if wishlist contains product.id %}♥ Saved{% else %}♡ Save{% endif %}
  </button>
{% else %}
  <a href="{{ routes.account_login_url }}?return_url={{ request.path }}"
     class="wishlist-btn-logged-out">♡ Log in to save</a>
{% endif %}
Write to the metafield
This is where it gets ugly. The Storefront API doesn’t let you mutate customer.metafields directly from anonymous JS — you need a customer access token, or an authenticated App Proxy. A minimal App Proxy handler (Node.js, deployed to Vercel/Cloudflare Workers) looks like:
// /api/wishlist-toggle  (Shopify App Proxy)
export default async function handler(req) {
  const { customerId, productId } = await req.json();

  const query = `
    mutation updateWishlist($id: ID!, $value: String!) {
      customerUpdate(input: {
        id: $id,
        metafields: [{
          namespace: "custom",
          key: "wishlist",
          type: "json",
          value: $value
        }]
      }) {
        customer { id }
        userErrors { message }
      }
    }
  `;

  // 1. Fetch current list
  // 2. Toggle productId
  // 3. Send mutation to Admin API
  // 4. Return new state
}
The full implementation runs about 200 lines once you handle auth, error states, and rate limiting. Realistic build time for a developer who hasn’t done this before: 1–2 days. For one who has: 2–3 hours.
Method 3: Hidden cart with line item properties (save for later)
Some tutorials suggest abusing the cart by adding wishlist items at quantity 0 or with a custom property like _wishlist: true. Don’t do this. It breaks cart math, confuses checkout, and most themes will render the items anyway. I’m including it only so you know to avoid it when you see it suggested on Reddit.
The only mildly defensible variant: a separate “Saved for later” cart attribute that you render outside the main cart, like this:
<!-- in cart.liquid -->
{% assign saved = cart.attributes.saved_items | split: ',' %}
{% if saved.size > 0 %}
  <div class="saved-for-later">
    <h2>Saved for later</h2>
    {% for handle in saved %}
      {% assign p = all_products[handle] %}
      <a href="/products/{{ p.handle }}">{{ p.title }} — {{ p.price | money }}</a>
    {% endfor %}
  </div>
{% endif %}
It’s a half-measure. Cart attributes vanish when the cart is emptied. Skip.
Method 4: Shareable URL wishlist (the social hack)
This one isn’t a real wishlist — it’s a “share your favorites” link. You build a list client-side, then encode it into a URL the shopper can share or bookmark.
// Build a share URL from the localStorage list
function getShareUrl() {
  const ids = JSON.parse(localStorage.getItem('shopify_wishlist_v1') || '[]')
    .map(i => i.id)
    .join(',');
  return `${location.origin}/pages/wishlist?items=${ids}`;
}

// On the wishlist page, hydrate from ?items=
const params = new URLSearchParams(location.search);
if (params.get('items')) {
  const ids = params.get('items').split(',');
  // Fetch each /products/{id}.js and render
  Promise.all(ids.map(id =>
    fetch(`/products/${id}.js`).then(r => r.json())
  )).then(renderWishlist);
}
Useful as an addition to method 1 — gives shoppers a way to share lists with friends or send to themselves. Not a wishlist on its own.
The honest verdict: when DIY is fine, when it breaks
DIY works if you can answer yes to all four:
- Your store has fewer than ~500 SKUs (so manual maintenance stays sane).
- You don’t care about cross-device sync (or you’re forcing customer accounts anyway).
- You don’t plan to email customers when wishlist items go on sale or come back in stock.
- You have either a developer on staff or comfort editing Liquid yourself.
DIY breaks the moment you want to:
- Email a customer “your wishlist item is back in stock” — you have no idea who owns the localStorage entry.
- Recover abandoned wishlists with SMS or email — same problem.
- Show wishlist conversion in analytics — you can fire GA4 events, but you can’t tie them to revenue without backend work.
- Let guests save without forcing account creation, and sync to their email when they later log in.
- Hand it to a non-technical marketer to manage.
These aren’t theoretical limitations. They’re the reasons most stores that start with a DIY wishlist swap to an app within 6 months.
What a DIY wishlist actually costs (be honest)
People search “without an app” because they assume the app is the expensive option. Let’s check.
A developer building the localStorage version: 2–4 hours. At $75/hr, that’s $150–$300, plus zero ongoing cost. Reasonable.
A developer building the metafield version with email triggers: 8–16 hours. $600–$1,200, plus a Klaviyo or similar to actually send the emails ($20–$45/mo). Plus maintenance every time your theme updates or Shopify changes its checkout extensions.
A separate wishlist app + a separate back-in-stock app + a separate preorder app: typically $15–25/mo each. So $45–75/mo for the three features.
A combined app: one bill.
Or: get all three in one app, with a free plan
Disclosure — we make Notify Me!, and we built it specifically because most stores need wishlist + back-in-stock + preorder together. Customers save a product → it goes out of stock → they get notified → if it never comes back, you offer a preorder. Three features that belong together.
What setup actually looks like
You toggle features on per page (product, collection, home) from the dashboard — no theme code to maintain:
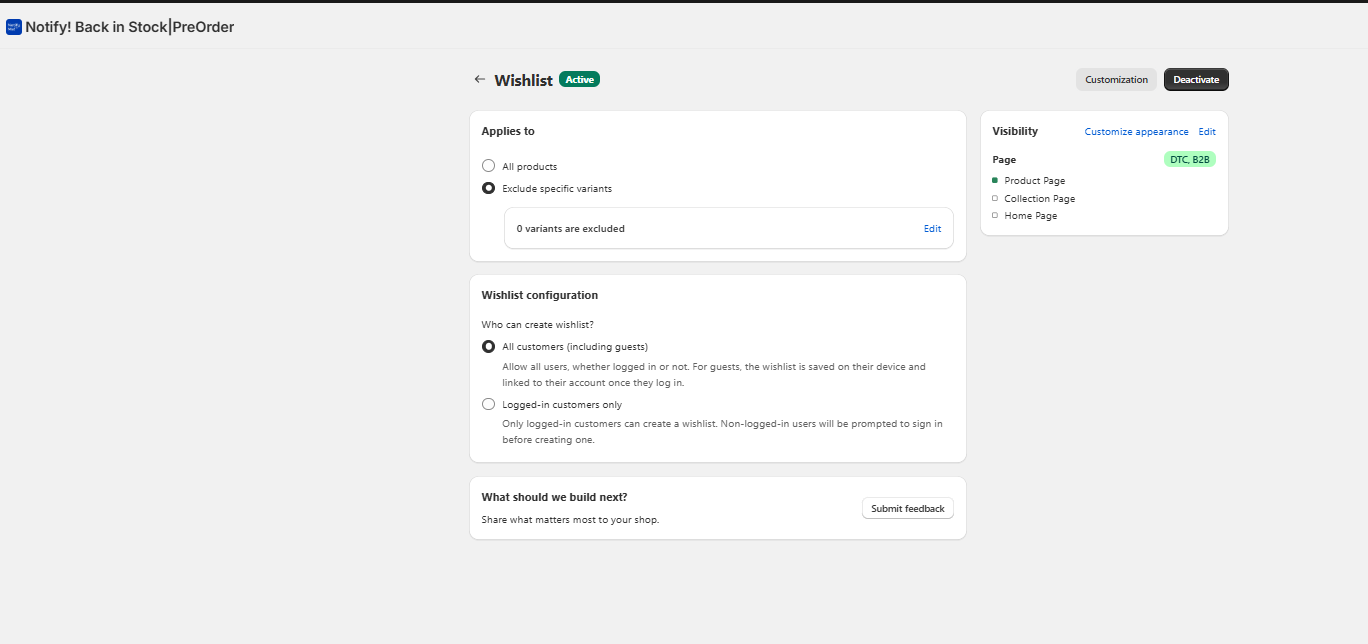 The Wishlist screen in Notify Me! — guest mode is on by default, and the wishlist is linked to a customer’s account the moment they log in. No code changes required.
Product-page button — fully customizable
Pick a heart, bookmark, or star icon. Edit both states’ labels. The widget renders inline next to your Add-to-Cart button:
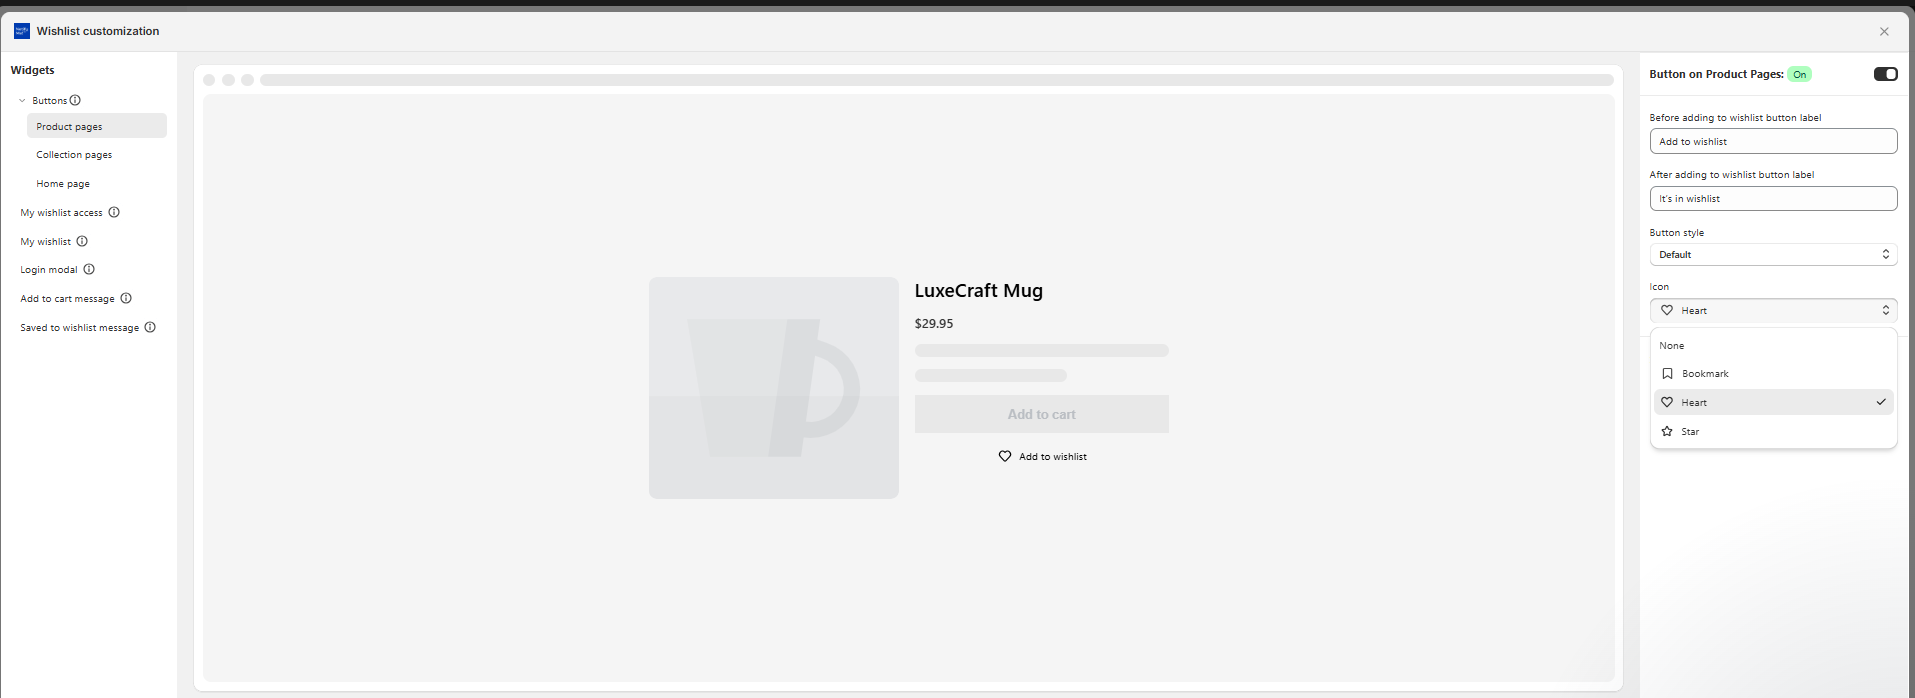 Product page button settings — set the before/after labels, the icon, and the style without touching Liquid.
Collection-page widget — works on every card
Where DIY methods struggle most: putting a working save button on every collection page tile. The app handles it as a single toggle:
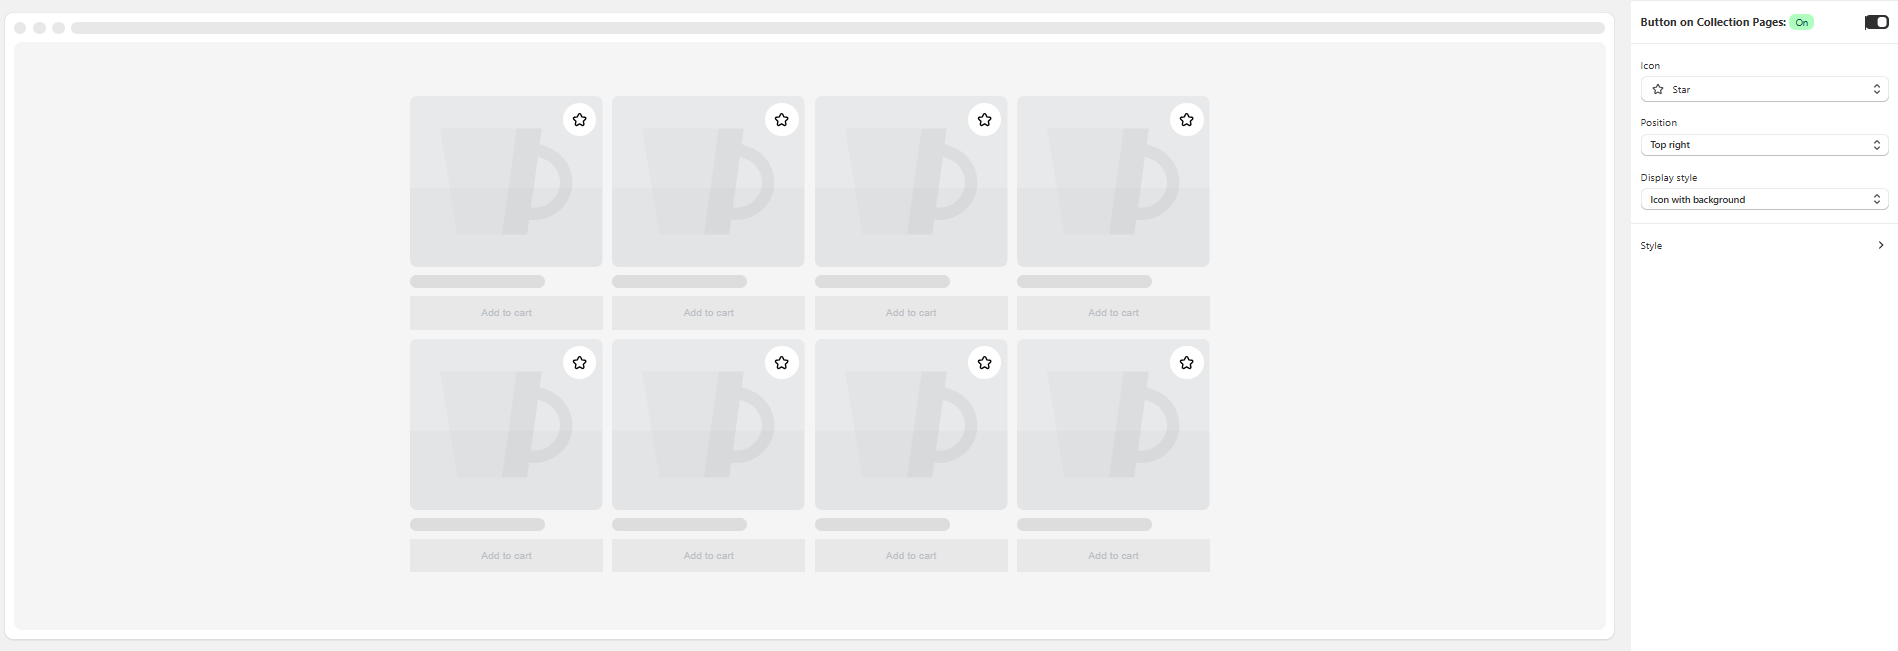 Collection page widget — pick icon, position, and display style. Renders on every product card automatically.
Pricing (annual billing)
| Plan | Price | Wishlist actions | Back-in-stock notifications | Preorders |
|---|---|---|---|---|
| Lite | Free | 50 lifetime | 100 lifetime | 5 lifetime |
| Starter | $15.92/mo | 24,000/yr | 6,000/yr | 6,000/yr |
| Standard | $31.92/mo | 120,000/yr | 18,000/yr | 18,000/yr |
| Rocket | $55.92/mo | 300,000/yr | 60,000/yr | 120,000/yr |
| Plus | $399.92/mo | Unlimited | Unlimited | Unlimited |
Full plan details on the pricing page. The free Lite plan exists so you can actually test it on your store before paying anything. Most stores stay on Starter long-term — $15.92/mo replaces three apps you’d otherwise install separately.
Features the DIY versions above can’t match:
- Guest mode (no forced login) — wishlist auto-links to the account on first login
- Multiple named lists per customer
- Wishlist widgets on home, collection, and product pages
- Automatic email and SMS triggers on price drop, low stock, and restock
- Built-in preorder buttons and partial payments
- Full Liquid customization to match your theme
- B2B and DTC support out of the box
Start free on the Shopify App Store →
FAQ
Can you add a wishlist to Shopify without coding?
Not without an app. Every no-code method requires either installing a wishlist app or pasting code into your theme. There’s no native toggle.
Is there a free Shopify wishlist?
Yes, a few. The localStorage method above is free if you build it yourself. App-wise, Notify Me’s Lite plan is free up to 50 wishlist actions lifetime, which is enough to validate that customers actually use the feature on your store before you pay for a higher plan.
Does Shopify 2.0 have wishlist?
No. Shopify 2.0 is the theme architecture (sections, blocks, app blocks) — it doesn’t add a wishlist feature. It does make installing a wishlist app cleaner via app blocks, which is why most modern wishlist apps embed into 2.0 themes in seconds.
Can I add a wishlist with just Liquid?
Partially. Liquid can display a wishlist if the data is in a customer metafield, but Liquid can’t write to metafields from the storefront. You’ll need JavaScript and either the Storefront API or an App Proxy to save items.
How do I add a wishlist to a Shopify product page without an app?
Use Method 1 above: paste the wishlist button snippet into your product template, add wishlist.js to your theme assets, and create a wishlist page from templates/page.wishlist.liquid. Full code in this guide.
Does a wishlist actually increase conversions?
Yes — saving signals real purchase intent, and wishlist-using shoppers typically convert at meaningfully higher rates than browse-only ones. The bigger lift comes from emailing wishlist holders when an item goes on sale or comes back in stock — that’s where DIY methods fall short.
What happens to a localStorage wishlist when the customer clears cookies?
It’s deleted permanently. No backup, no recovery. This is the single biggest reason stores outgrow the DIY approach.
Can a wishlist trigger back-in-stock emails?
Only if you tie the wishlist to a customer email. localStorage can’t. Customer metafields can, but you still need a backend to detect inventory changes and send the email. An app that does both — like Notify Me! — skips that work entirely.
What’s the difference between a wishlist and a waitlist?
A wishlist is a curated list of products a shopper wants to remember; a waitlist is a queue for a product that’s temporarily out of stock or pre-launch. Wishlists are open-ended; waitlists are time-bounded by inventory or release date. Most stores eventually want both.
Is it better to use Continue Selling When Out of Stock or a wishlist?
Different problem. Continue selling when out of stock lets you accept orders for unavailable inventory (essentially a preorder). A wishlist lets shoppers save items without committing. If you’re trying to capture demand on an unavailable product, you usually want both — a wishlist to gather intent and a preorder option for the shoppers ready to buy now.
Last updated: June 2026. Written for Shopify themes on Online Store 2.0. If your theme is older (vintage), the Liquid paths differ slightly — the JavaScript is identical.